Quest Pro
The Meta Quest Pro provides eye gaze tracking, detailed eye expression tracking, and face tracking. All eye and face tracking hardware is internal to the device (no additional hardware setup required). All eye and face tracking data is accessed via Meta’s Face and Eye OpenXR extensions.
Why is this setup required?
The Quest Pro provides developers with both eye and face tracking data from a single, contained device, making it easy for native Quest developers to incorporate. However, having it only accessible through Meta’s Oculus OpenXR extensions means there must be an OpenXR application using the Oculus runtime running somewhere. There is currently no way for VRCFT to provide eye and face tracking to the Quest version of VRChat, the following solutions are only for PCVR.
Setup
The Quest Pro currently has 2 different face-tracking compatible ways to connect to the PC:
- Oculus Link (or Airlink)
- ALVR
The user is free to choose whatever method they prefer more. ALVR is an open-source project and thus has many for features and customizability in the PCVR connection as compared to Airlink, but also has more bugs or quirks. Oculus Link/Airlink is Meta’s own PCVR streaming solution, and is generally more straight-forward to set up and network stable, but also is limited in customization.
In both cases the user is expected to have the VR PC and the Quest Pro on the same network, with the PC ideally connected to the network via ethernet cable.
Enabling Developer Mode on the Headset
Instructions originally from https://learn.adafruit.com/sideloading-on-oculus-quest/enable-developer-mode
- Set up a Meta Oculus developer account
- A developer account is necessary (for now) as the eye and face OpenXR extensions are currently considered "developer features". It is rather trivial to apply for and there is no check for being a "real organization".
- Install the Oculus ("Meta Quest") app on mobile device (if it isn’t already) and login with your (developer) Oculus account. Register your headset in the app.
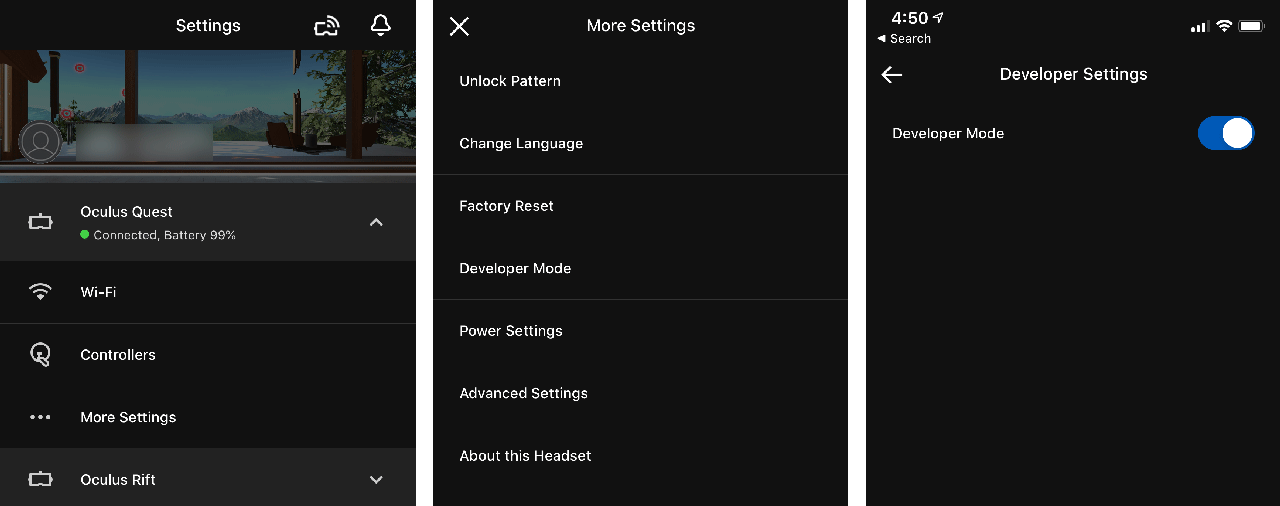
- In the Oculus mobile App, tap Menu at the bottom right, then Devices. Select your Quest Pro, then go to
Settings -> Developer Modeand set the Developer Mode switch to enabled.- Reboot the headset after enabling Developer Mode.
Enabling Eye and Face Tracking on the Headset
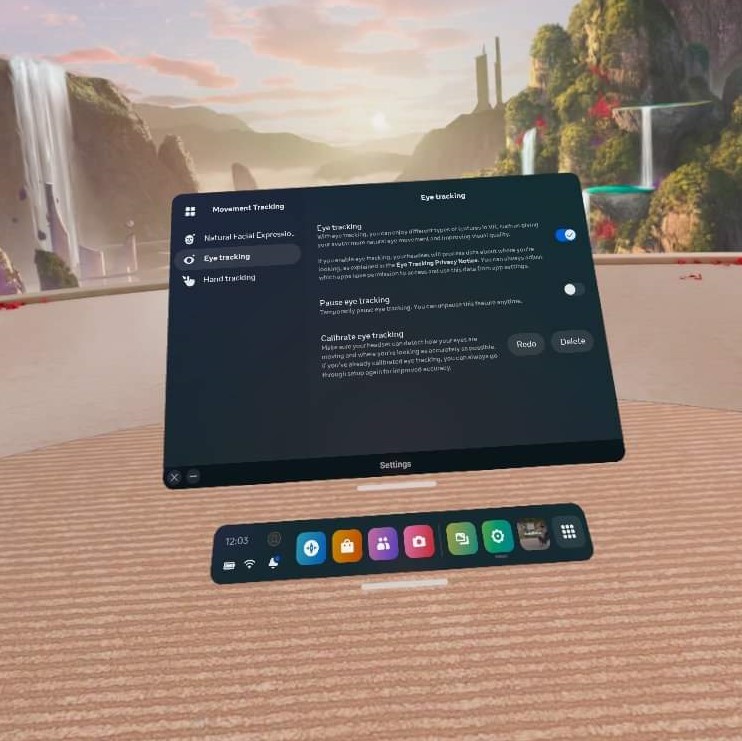
- Open up the Settings in your Quest Pro headset, and navigate to "Movement Settings"
- Select the "Natural Facial Expressions" tab on the left, then Enable Natural Facial Expressions
- Select the "Eye Tracking" tab on the left, then Enable Eye Tracking. If you haven’t already, calibrate your eye tracking
Oculus Link/Airlink Setup
Thanks to Fox McCloud#7787 and Adjerry91#2031 for the original set of instructions.
If you prefer following video tutorials, these following videos by Ninka_#7958 cover the steps for either Oculus Link method.
It is still recommended to read through this text reference after as their videos may miss or glance over some important steps/details!
- Set your headset to developer mode using the Oculus mobile appdanger
Do not skip this step. Please follow the instructions for setting the headset to developer mode using the mobile app before proceeding. Even if you think it is in developer mode already, follow the instructions anyways.
- Enable Headset Eye and Face Tracking
- Install and start the Oculus PC application (if it isn't already).
- Follow setup instructions for logging in and adding your Quest Pro to
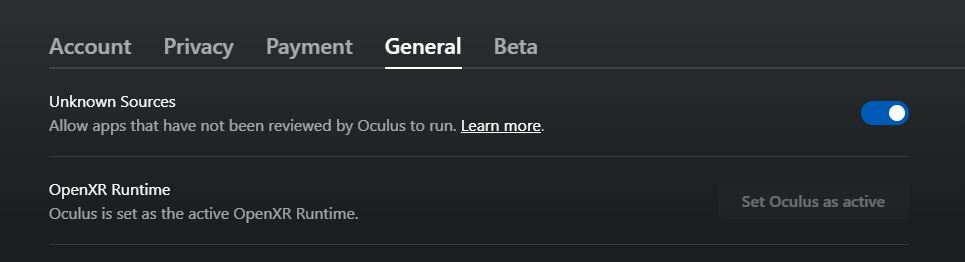
Devices. - In the Oculus PC application, click on
Settingsin the left sidebar, thenGeneraltab. Turn onUnknown Sources. Set theOpenXR Runtimeto OculusdangerSET THE OPENXR RUNTIME TO OCULUS. This is the second most forgotten step of Quest Pro setup.
- Navigate to the
Betatab. EnableDeveloper Runtime Features,Eye tracking over Oculus Link, andNatural Facial Expressions over Oculus Link.- You can try enabling
Passthrough over Oculus Linkbut that may cause issues.noteIf you do not see these options, you did not follow the previous steps correctly.

- You can try enabling
Connection Methods
Oculus Link PCVR connection has 2 different solutions for streaming out face tracking data into VRCFT. This guide will cover both. Though there is currently no functional difference between the two, the ALXR Windows client method does require starting another program.
ALXR Windows Client Method
This method uses コレヂャン (Korejan)#6829's ALXR windows client to pull the data from the desktop Oculus OpenXR runtime.
Download the latest ALXR-experimental
alxr-client-win-x64.zipreleaseUnzip the
alxr-client-win-x64.zip. Inside, you should find aalxr-client.exe.Create a shortcut for
alxr-client.exe: Select the file, right-click -> Create Shortcut. Move the shortcut somewhere convenient if you would like.Right-click on the newly created shortcut to
alxr-client.exeand open Properties. Add--no-alvr-server --no-bindingsflags to the end of the "Target:" box. Make sure to maintain a space between the flags and what was in the box already, and keep the flags outside the quotation marks of the file path if they exist.

Download the latest VRCFT build and the
questProSensitivity.inifile from Jerry's Quest Pro build of VRCFaceTracking- Ensure
questProSensitivity.iniis in the same location as VRCFT. This file allows you to set some multipliers on the face tracking values received from the headset. Despite seeming optional, Jerry's build will grumpily throw out an error if this file is missing from the same directory as the .exe
noteThis build of VRCFaceTracking will be replaced by a module in the coming update to VRCFaceTracking.
- Ensure
Create a .txt file named
questProIPin the same directory as theVRCFaceTracking.exeandquestProSensitivity.ini. In the newly created file, enter127.0.0.1as the only text in the file and save the file.
Setup Complete! See the Startup Procedure for use instructions.
OpenXR Module Method
This method uses TofuLemon#2692's Quest Pro OpenXR build of VRCFT and tracking module to pull the data from the desktop Oculus OpenXR runtime.
- Download the latest
QuestFaceTrackingOpenXR.ziprelease - Unzip the
QuestFaceTrackingOpenXR.zipsomewhere. Keep all the unzipped files together in their own folder. - Run
VRCFaceTracking.exeapplication once, then close it. - Copy the
VRCFT Module - QuestOpenXR.dllfile to your..AppData\Roaming\VRCFaceTracking\CustomLibsfolder.noteYou can easily get to your
..AppData\Roamingfolder by typing%AppData%into your Windows search or the address bar of any Explorer window.
Setup Complete! See the Startup Procedure for use instructions.
Startup Procedure for Oculus Link/Airlink
- Launch (Air)Link on the Quest Pro. Make sure you are in the Oculus Home environment before proceding.
- (If you are using ALXR client method) Launch the ALXR windows client using the previously created shortcut.
- Launch VRCFaceTracking. If you are using TofuLemon's VRCFaceTracking, it will start an internal OpenXR client.
- Launch SteamVR from the PC
ALVR/ALXR Setup
- Install SideQuest (Advanced Installer) on your computer. https://sidequestvr.com/setup-howto
- The SideQuest application will have a built-in tutorial for the following steps.
- Set your headset to developer mode using the Oculus mobile app. :ref:
enable developer modedangerDo not skip this step. Please follow the instructions for setting the headset to developer mode using the mobile app before proceeding. Even if you think it is in developer mode already, follow the instructions anyways.
- Enable Headset Eye and Face Tracking
- Connect your Quest Pro headset to your computer with a data-transfer USB cable. Once connected you will be prompted to "Allow USB debugging" and "Allow File Access". Make sure to allow both. (You should also check the Always allow from this computer box to prevent the message from popping up again later) Your headset should now be ready to be used with SideQuest.
- Download the latest ALXR Quest Client (
alxr-client-quest.apk) - Use SideQuest to install
alxr-client-quest.apkto your Quest Pro. Click the "Install APK file from folder" button, then select the downloadedalxr-client-quest.apkin the file prompt.
- Download ALVR Server v18.2.3 (
alvr_server_windows.zip)- Optionally, you can try this custom build of alvr_server v18 from korejan that includes the encoding changes found in alvr v19note
Newer versions of ALVR server are incompatible with ALXR client, so only use the linked options here (for now!)
- Optionally, you can try this custom build of alvr_server v18 from korejan that includes the encoding changes found in alvr v19
- Unzip
alvr_server_windows.zipsomewhere convenient, then launchALVR Launcher.exe. Follow the initial setup procedure in the launched ALVR Server app. - Once the ALVR Server is up and running, launch the
alxr_clientapp that you installed earlier on your Quest Pro. In your Apps Library, you will need to set the category of shown apps to "Unknown Sources" to see the installedalxr_client.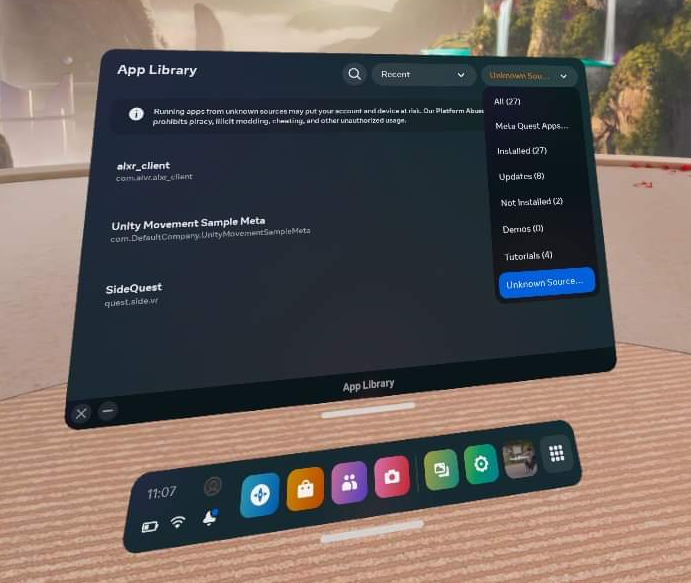
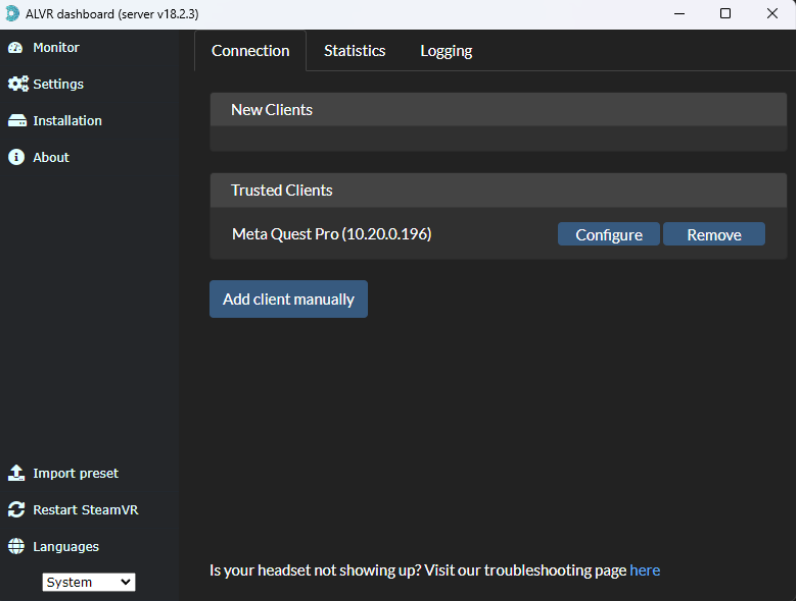
- With ALXR client running on the headset, go back to the ALVR Server PC application and make sure you're on the "Connections" tab.
There should now be a Meta Quest Pro in the "New Clients" list, with a "Trust" button on the right side of its entry.
Click "Trust" to allow the ALVR server app to make the connection to the ALXR client app on the Quest Pro.
Back in the headset, SteamVR should now be streamed from the PC to the headset.
- Download the latest VRCFT build and the
questProSensitivity.inifile from Jerry's Quest Pro build of VRCFaceTracking- Ensure
questProSensitivity.iniis in the same location as VRCFT. This file allows you to set some multipliers on the face tracking values received from the headset. Despite seeming optional, Jerry's build will grumpily throw out an error if this file is missing from the same directory as the .exenoteThis build of VRCFaceTracking will be replaced by a module in the coming update to VRCFaceTracking.
- Ensure
- Create a .txt file named
questProIPin the same directory as theVRCFaceTracking.exeandquestProSensitivity.ini. In the newly created file, enter the local IP address as shown next to "Meta Quest Pro" in the ALVR server application as the only text in the file, and save the file.
If you are planning on using a USB cable instead of Wi-Fi streaming for the ALXR/ALVR connection
- Follow the Official ALVR Community Instructions for setting up the USB connection.
- Change the text in the
questProIPfile to127.0.0.1
Startup Procedure for ALVR/ALXR
- Launch the ALVR server application on the PC and the alxr_client application in the Quest Pro headset.
- Launch VRCFaceTracking.exe
Tips and Tricks
Aligning Play Spaces with SteamVR Lighthouse-tracked Devices
Using Index Controllers with the Quest Pro with Link/Airlink
Download these Powershell Scripts (Discord Link)
To run, right-click the file -> "Run with Powershell"
Using Index Controllers with the Quest Pro with ALVR/ALXR
The customizability of ALVR allows a few options in this regard. All following mentioned settings can be found in the "Headset" tab of the ALVR settings.
- Option 1: Completely disable the Quest Pro controllers using the checkbox next to "Controllers"
- Option 2: Set the Controller emulation to "HTC Vive Tracker". This allows real controllers such as the Index Controllers to take precedence in SteamVR, and allow for using the Quest Pro controllers for manual playspace calibration.
Common Issues (and How to Solve Them)
ALXR/ALVR methods: "[ERROR] No connection could be made because the target machine actively refused it"
- Cause: The ALXR VRCFT server is not running.
- Solution: Usually the problem is related to missing a step and the ALXR log may make it clear as to what step exactly was forgotten.
OpenXR VRCFT module method: "[QuestOpenXR] Failed to GetFaceExpressionWeightsFB"
- Cause: There is some permission in the setup that was not set correctly.
- Solution: Carefully re-run through the setup, paying careful attention to all the steps before the method split.
"I 100% made sure I followed all setup correctly, and I'm not getting any visible errors anywhere, but VRC only receives 0 values for all parameters (and VRC loaded a non-zero number of parameters from config)"
- Solution: Try toggling the eye and face tracking enables in the headset settings.
Oculus Link/Airlink: My playspace calibration resets if I take off the headset.
- Cause: When the Quest headset enters sleep mode after detecting you have taken off the headset, it loses it's original reference space to which the SteamVR space was calibrated to.
- Solution: Download the Meta Quest Developer Hub and follow the instructions for Connect Headset to MQDH and Disable proximity sensor and guardian. This will prevent the headset from entering sleep, but does mean your headset stays fully active even if you take it off.