Quest Pro
The Meta Quest Pro provides eye gaze tracking, detailed eye expression tracking, and face tracking. All eye and face tracking hardware is internal to the device (no additional hardware setup required). All eye and face tracking data is accessed via Meta's Face and Eye OpenXR extensions. There is currently no way for VRCFT to simultaneously extract data from the headset and send eye and face tracking to the Quest version of VRChat, so the following solutions are only for PCVR. Previously, a beta version of the native VRChat Quest client included built in eye tracking support without the need for VRCFaceTracking. This version is discontinued and is no longer available.
Why is this setup required?
The Quest Pro provides developers with both eye and face tracking data from a single, contained device, making it easy for native Quest developers to incorporate. However, having it only accessible through Meta's Oculus OpenXR extensions means there must be an OpenXR application using the Oculus runtime running somewhere. Difficulty of the setup process depends on the desired PCVR connection method.
The Quest Pro face tracking is susceptible to moisture damage. Learn more
Setup
The basic Quest Pro setup flow:
- Enable Eye and Face Tracking on the Headset
- Complete set-up for desired PCVR connection method
- Install corresponding VRCFT module
The Quest Pro currently has 5 readily available face-tracking compatible PCVR connection methods, listed in no particular order:
Oculus Link/Airlink is Meta's own PCVR streaming solution, and is generally straight-forward to set up (the PCVR part, not the face tracking part) and network stable, but also is limited in customization. ALXR/ALVR are open-source projects and thus has many for features and customizability in the PCVR connection as compared to Airlink, but also may have more bugs, quirks, and generally may be harder to use. Virtual Desktop is commonly seen as the "best" PCVR streaming solution, but it is not free, unlike all the other options. SteamLink is Valve's (free) PCVR steaming solution meant specifically for using Quest headsets with SteamVR.
If you need a recommendation for what to use for PCVR streaming:
- If you don't want to spend money and want to connect wirelessly: you should start with SteamLink as it has the easiest and most straightfoward setup.
- If you don't mind spending money: you should use Virtual Desktop for ease of use and additional features.
- If you must use a wired (USB) connection: you should start with Oculus Link/Airlink.
With any option, the user is expected to have the VR PC and the Quest Pro on the same network, with the PC ideally connected to the network via ethernet cable (for wireless PCVR), or Quest Pro connected to the PC with a high-quality USB 3.0+ cable (for "wired" PCVR, Virtual Desktop and SteamLink excluded). You can learn more about improving your Quest PCVR streaming experience with the many guides available online.
Enable Eye and Face Tracking on the Headset
- Open up the Settings in your Quest Pro headset, and navigate to "Movement Settings"
- Select the "Natural Facial Expressions" tab on the left, then Enable Natural Facial Expressions
- Select the "Eye Tracking" tab on the left, then Enable Eye Tracking. If you haven't already, calibrate your eye tracking

Meta Quest Link/Airlink Setup
Meta Quest Link/Airlink Setup
Prefer a video? Community member Ninka has graciously created another tutorial video for the Quest Pro and VRCFT 5.0+ that goes over the entire setup procedure, including the VRCFT module installation for the Meta Quest (formerly "Oculus") Link/Airlink module "Quest Pro OpenXR".
Developer mode is only required if using Meta Quest Link/Airlink!
CREATE DEVELOPER ACCOUNT AND ENABLE DEVELOPER MODE:
- Set up a Meta Quest developer account
- A developer account is still necessary as the eye and face over Meta Quest Link toggles are currently still in the developer settings of the Meta Quest Link PC application. It is rather trivial to apply for and there is no check for being a "real organization".
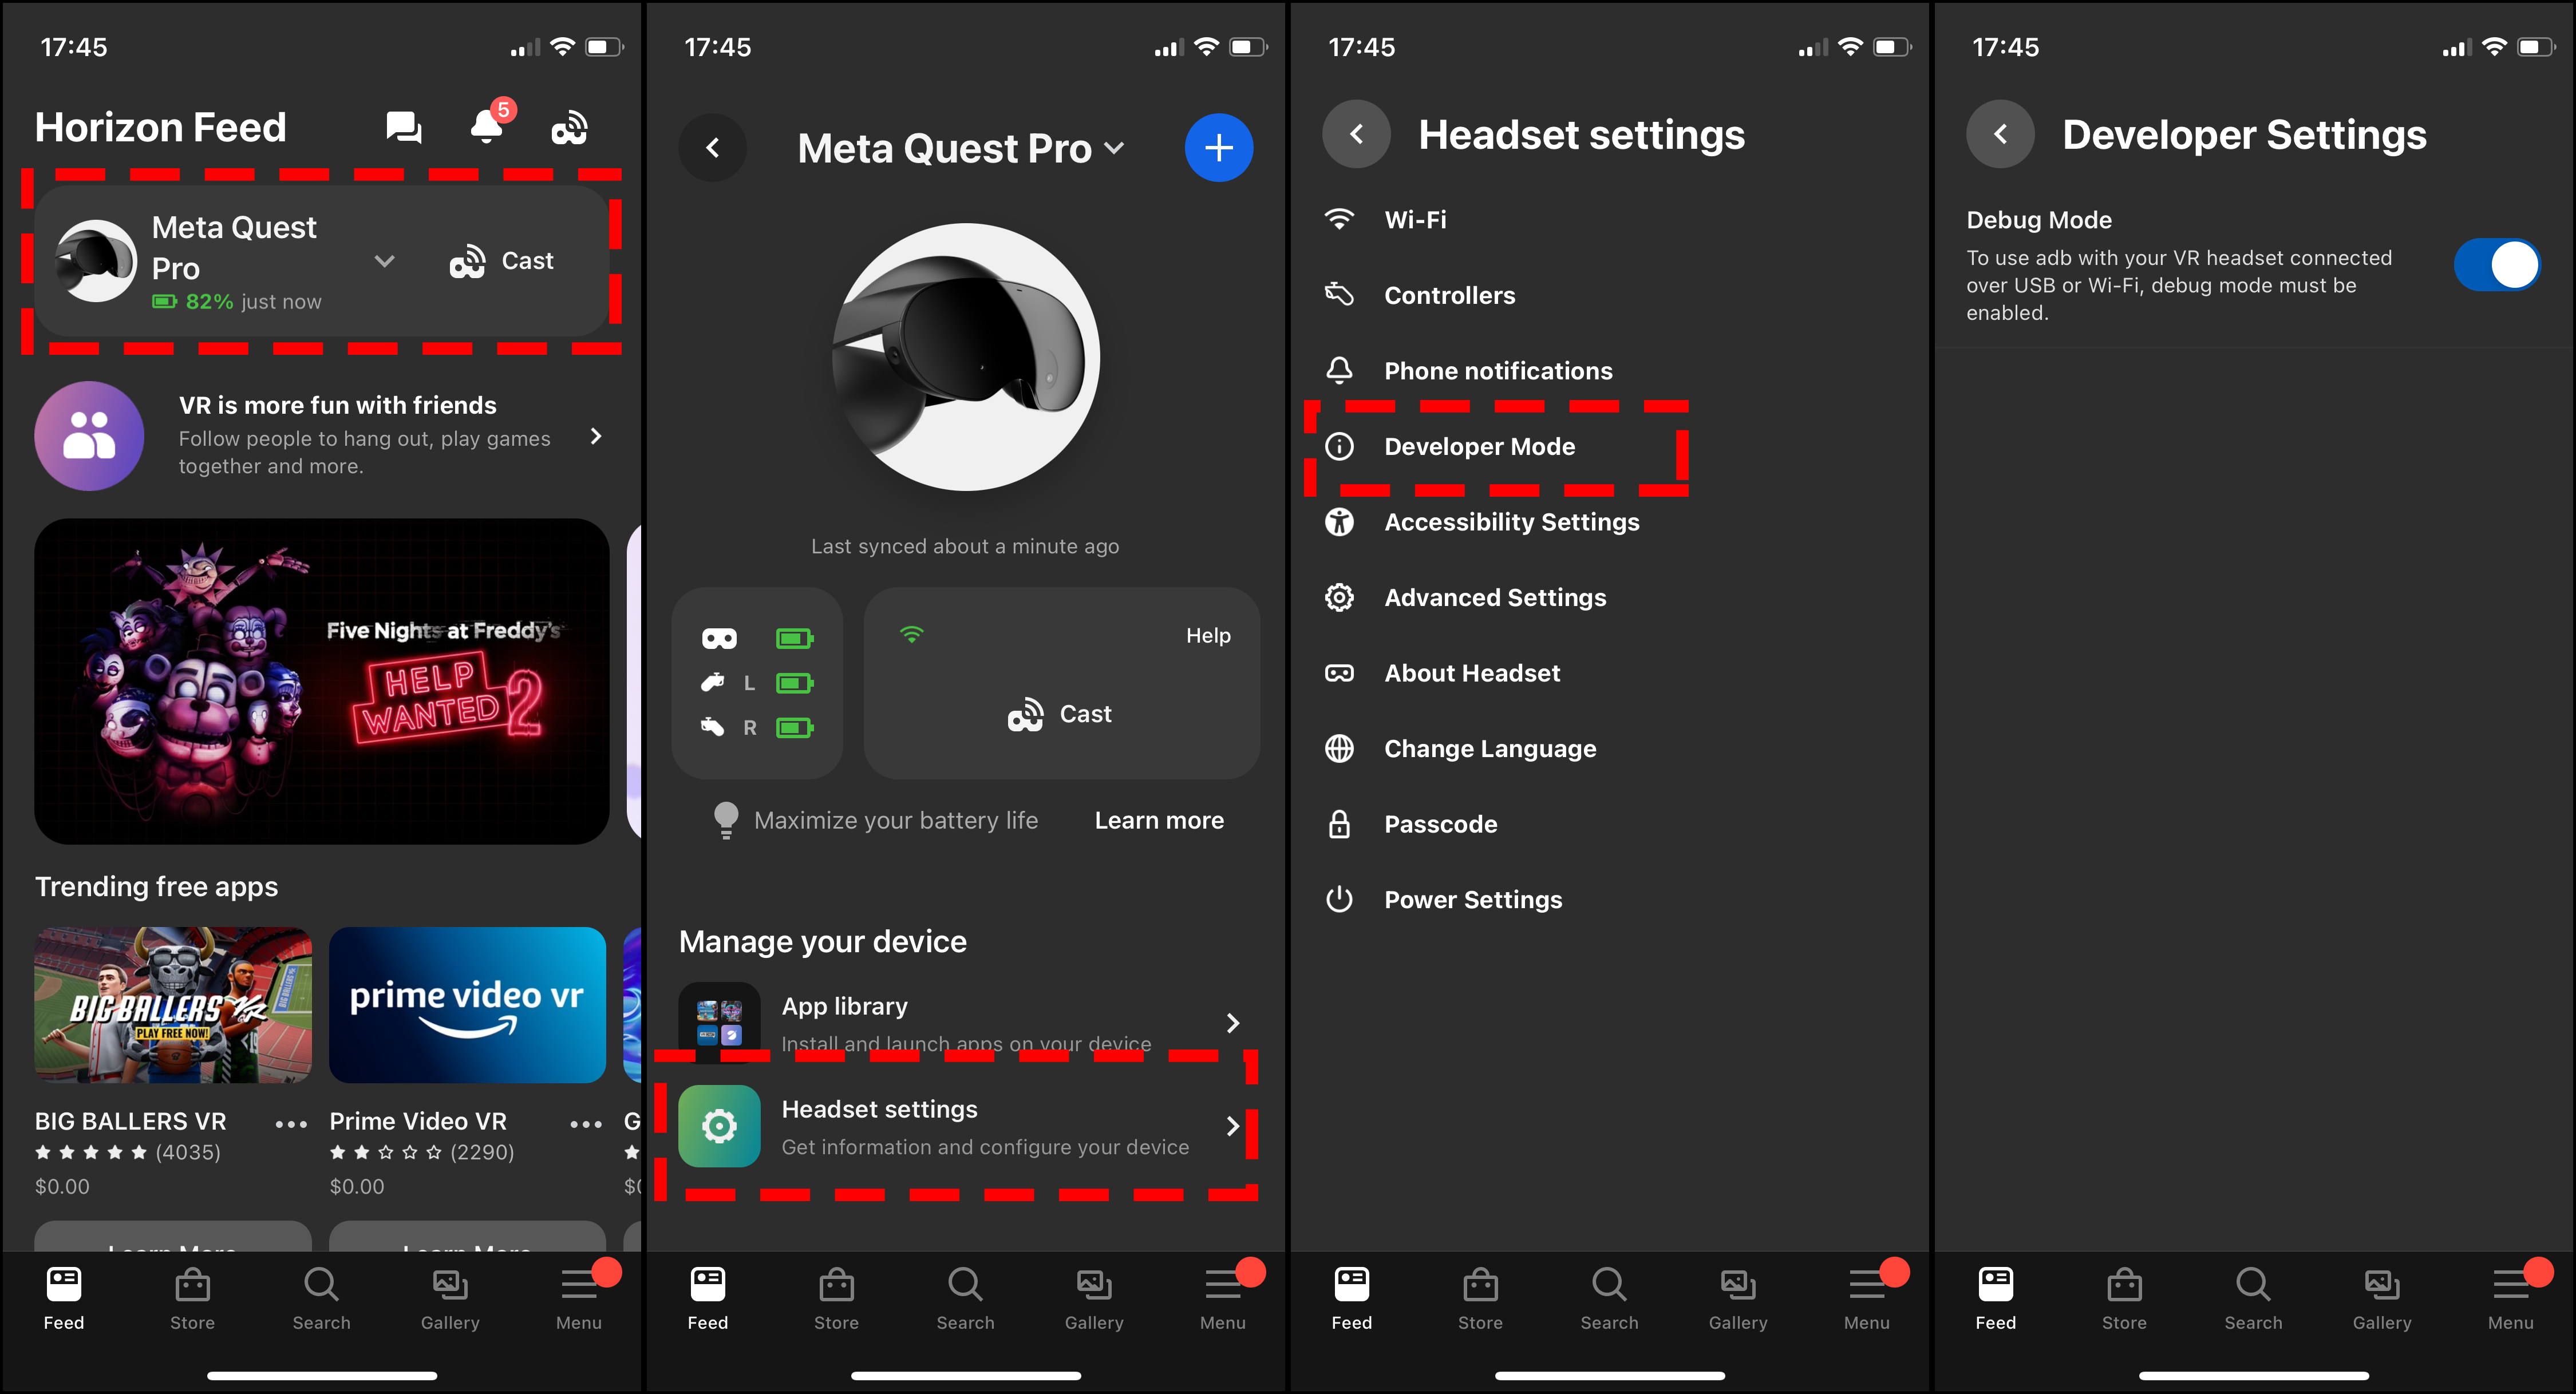
- Install the Meta Horizon (formerly "Oculus" and "Meta Quest") app on mobile device (if it isn't already) and login with your (developer) Meta Quest account. Register your headset in the app.
- In the Meta Horizon mobile App, tap Menu at the bottom right, then Devices. Select your Quest Pro, then go to
Settings -> Developer Modeand set the Developer Mode switch to enabled.- Reboot the headset after enabling Developer Mode.
- This setting was formerly called "Developer Mode" in software versions before v60, became "Debug Mode" for a few cycles, and is now back again as "Developer Mode"
- Set up a Meta Quest developer account
Install and start the Meta Quest Link PC application (if it isn't already).
Follow setup instructions for logging in (with the same developer account created/used earlier to enable dev mode on the headset!) and adding your Quest Pro to
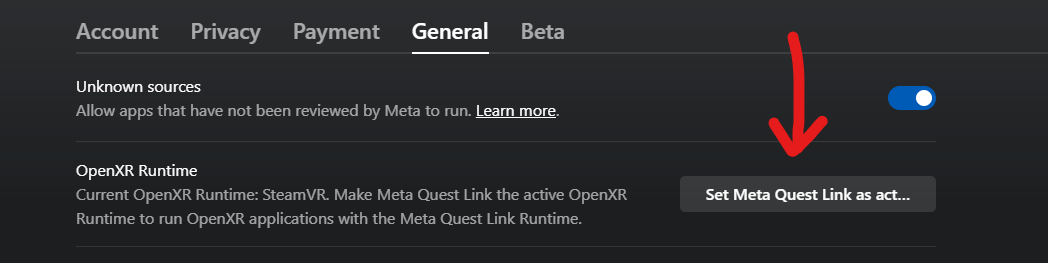
Devices.In the Meta Quest PC application, click on
Settingsin the left sidebar, thenGeneraltab. Turn onUnknown Sources, and set theOpenXR RuntimetoMeta Quest Link.
SET THE OPENXR RUNTIME TO Meta Quest Link. Do not forget to do this step!
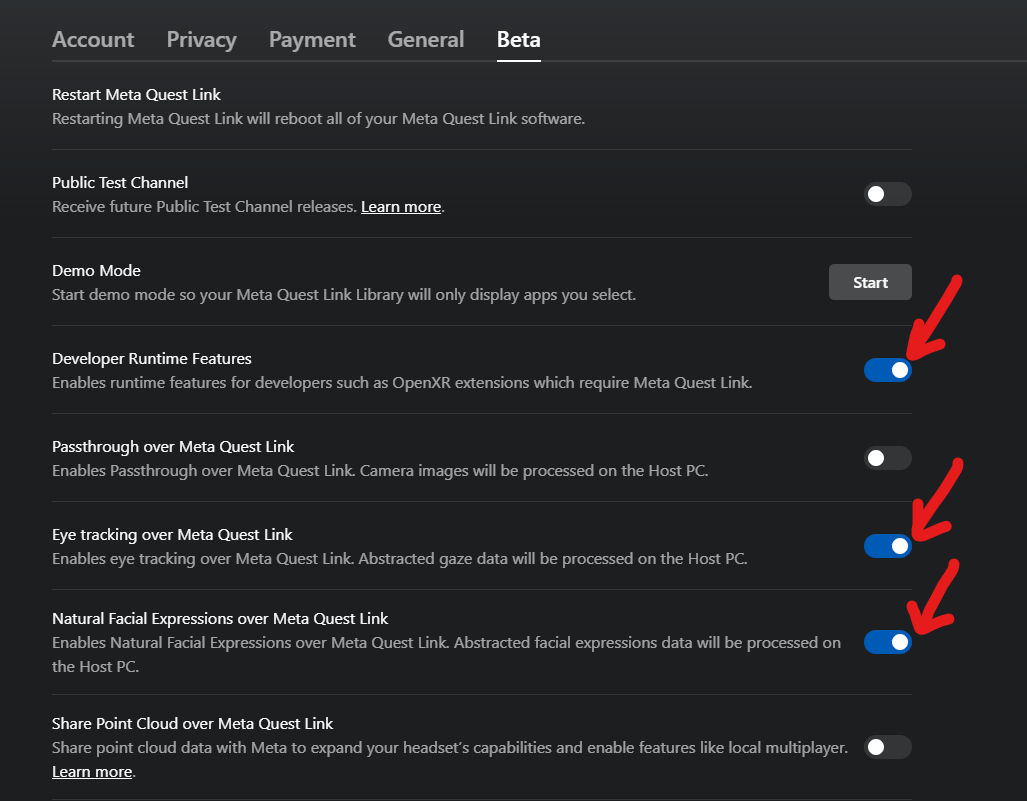
- Navigate to the
Betatab. EnableDeveloper Runtime Features,Eye tracking over Meta Quest Link, andNatural Facial Expressions over Meta Quest Link.
- Note that
Passthrough over Meta Quest Linkoption may cause issues and unless you are making or using PCVR apps that use Quest headset passthrough, you should just leave this disabled. - Enable Public Test Channel only if you know you want to use some feature/fix in the latest Public Test Channel (beta) software. Generally, it is better to stay off the PTC.
If you do not see these options, you are not logged into a Meta Quest developer account or you may need to refresh your login.
- Proceed to Modules for compatible modules to use with Link/Airlink.
ALXR Setup
Using ALXR will require you to sideload applications to you Quest
ALXR Setup
- MAKE SURE YOUR HEADSET HAS EYE AND FACE TRACKING ENABLED
- Download and install the latest ALXR client and server from the ALXR-nightly repository. If this is your first time using ALXR, follow the Usage guide and Android-specific client install instructions
- Install the ALXR Remote module from the VRCFaceTracking module repository.
- Open the
ALXRModuleConfig.jsonfound in the installed module directory.- You may need to navigate to
C:\Users\[username]\AppData\Local\Packages\96ba052f-0948-44d8-86c4-a0212e4ae047_d7rcq4vxghz0r\LocalCache\Roaming\VRCFaceTracking\to find the module directory and config json. - Learn more about the ALXR module configuration options
- You may need to navigate to
- In
ALXRModuleConfig.json, in the "RemoteConfig" section set "ClientIpAddress" to the headset IP, this can be found in the ALVR server dashboard.- If the client is being run on the same host as the server (e.g. alxr windows client), use localhost IP (default,
127.0.0.1) and set the server to TCP protocol.
- If the client is being run on the same host as the server (e.g. alxr windows client), use localhost IP (default,
- Restart VRCFT to reinitialize the ALXR Remote Module with the updated configuration.
ALVR Setup
ALVR Setup
- MAKE SURE YOUR HEADSET HAS EYE AND FACE TRACKING ENABLED
- Install the ALVR streamer on the PC and ALVR client on the Quest Pro if you have not already. Follow the ALVR Install instructions if this is your first time using ALVR.
- Launch ALVR streamer and set
Eye and face trackingtoVRCFaceTracking. - Start the client on the Quest Pro and connect.
- Install the ALVR Module from the VRCFaceTracking module repository.
Virtual Desktop Setup
Virtual Desktop Setup
This following setup assumes that Virtual Desktop has already been purchased from the Quest Store in the headset and the Virtual Desktop Streamer PC-side app has been installed on the PC. Please refer to Virtual Desktop's built-in setup instructions to get started with using Virtual Desktop.
- MAKE SURE YOUR HEADSET HAS EYE AND FACE TRACKING ENABLED
- In the Virtual Desktop app on the headset, go to the "Streaming" tab, and enable the option
Forward tracking data to PC. Make sure to click Yes to the popup.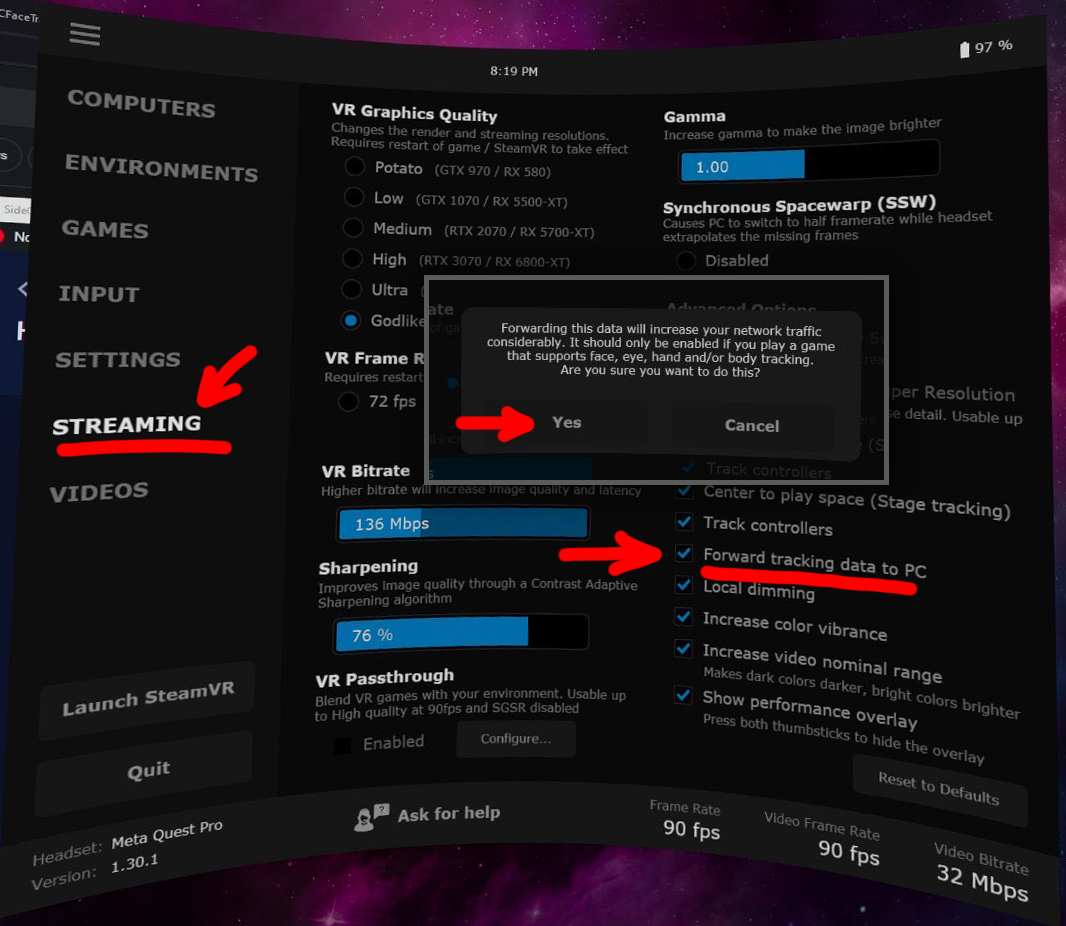
- Start Virtual Desktop Streamer if you have not already and establish headset connection to the PC.
- Proceed to Modules for compatible modules to use with Virtual Desktop.
To let the Virtual Desktop VRCFT module properly initialize, make sure to start VRCFT with the Virtual Desktop module installed after you start the Virtual Desktop Streamer program on the PC.
SteamLink Setup
SteamLink Setup
Do NOT change the OSC port settings in the VRCFaceTracking program! Changing either the input or output port to 9015 WILL CAUSE PROBLEMS AND NOTHING WILL WORK. Those VRCFT port settings are for communication with VRChat, not SteamLink.
- Follow Valve's official Setup instructions for SteamLink
- MAKE SURE YOUR HEADSET HAS EYE AND FACE TRACKING ENABLED
- Once connected to SteamVR, open the SteamVR menu, open VR Settings, and enable "Advanced Settings" by moving the toggle to "Show" in the bottom left. You can also access this exact same settings menu from the desktop SteamVR devices window.
- Navigate to the Setting tab "Steam Link", and enable the following options:
- Enable OSC
- Share eye tracking data to other apps on this PC
- Share face tracking data to other apps on this PC via OSC
- Set the OSC output port in SteamLink settings to
9015 (ALT). Do NOT adjust port settings in VRCFaceTracking settings.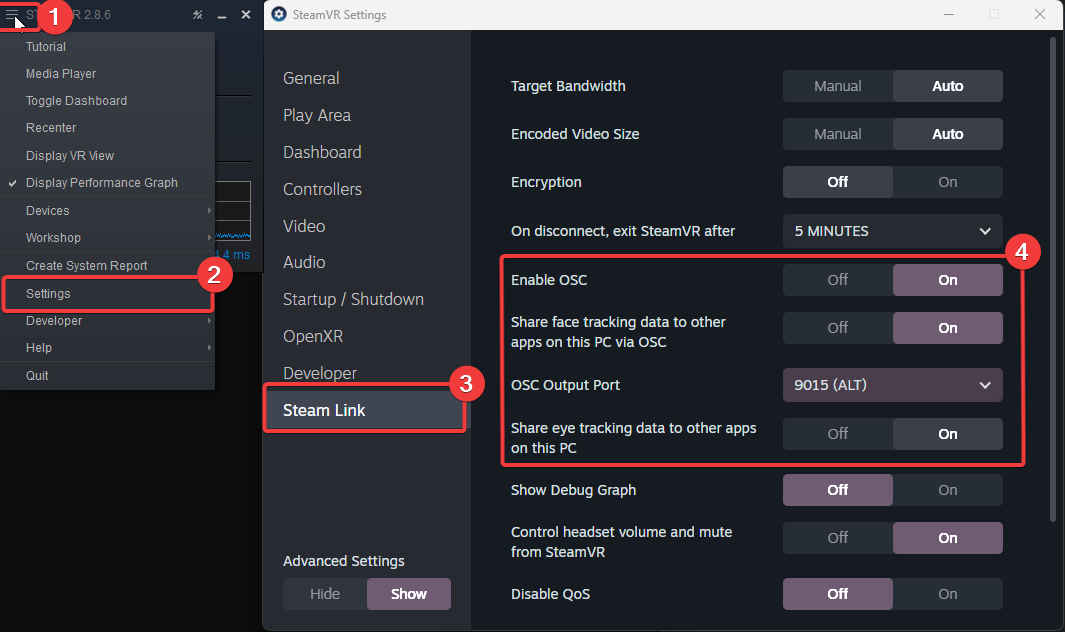
- Proceed to Modules for the module to use with SteamLink.
Do NOT change the OSC port settings in the VRCFaceTracking program! Changing either the input or output port to 9015 WILL CAUSE PROBLEMS AND NOTHING WILL WORK. Those VRCFT port settings are for communication with VRChat, not SteamLink.
Modules
There are a total of 6 different VRCFT modules that can be used for the Quest Pro. The links are to Module source repositories, for those interested in contributing and improving the modules. All* modules are readily available for installation via the VRCFaceTracking built-in module registry. Learn how to install modules from the module registry.
- If you are using Meta Quest Link/Airlink, you have the options of:
- Quest Pro OpenXR module
- You must use VRCFT version 5.2.3.0 with this module.
- ALXR Local module
- Quest Pro OpenXR module
- If you are using ALXR, you will need to use the ALXR Remote module.
- If you are using ALVR, you will need to use the ALVR module.
- If you are using Virtual Desktop, you will need to use the Virtual Desktop module. ALXR Local module can be used for VRCFT instead of the Virtual Desktop module if VDXR is set as the active runtime.
- If you are using SteamLink, you will need to use the SteamLink VRCFT Module
Tips and Tricks
The following section contains various potentially useful but completely optional instructions.
Using Sidequest to Side-load Quest Apps
- Install SideQuest (Advanced Installer) on your computer
- The SideQuest application will have a built-in tutorial for the following steps.
- Connect your Quest Pro headset to your computer with a data-transfer USB cable. Once connected you will be prompted to "Allow USB debugging" and "Allow File Access". Make sure to allow both. (You should also check the Always allow from this computer box to prevent the message from popping up again later)
- Use SideQuest to install
alxr-client-quest.apk(or whatever other application you want) to your Quest Pro. Click the "Install APK file from folder" button, then select the desired.apkfile in the file prompt.
- SideQuest should have a green notification bar show up at the bottom saying the operation was successful.
You may need to uninstall the previous version of the app you are trying to sideload if it exists and SideQuest fails the current app install.
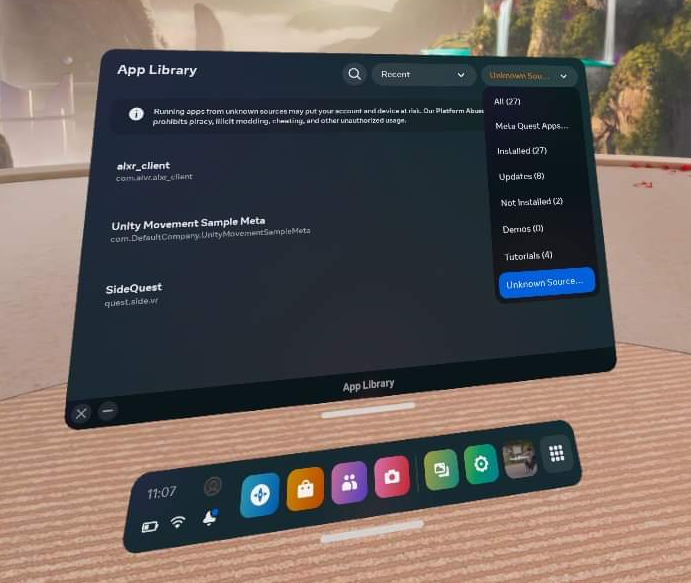
- In your Apps Library, you will need to set the category of shown apps to "Unknown Sources" to see the sideloaded application. You will need to tap the Search bar first before you see the category filter dropdown.
Aligning Play Spaces with SteamVR Lighthouse-tracked Devices
To use Vive trackers or other SteamVR Lighthouse tracked devices with the Quest Pro, you'll need to use OpenVR-SpaceCalibrator. While the original from pushrax will work, many "Mixed VR" users have found the continous calibration forks to be better:
- bdunderscore's OVRSC fork
- ArcticFox8515's OVRSC fork of bdunderscore's fork
- Recommended option: Hekky's OVRSC fork, which comes with important performance fixes for continuous calibration
Using Index Controllers with the Quest Pro with Link/Airlink
Download these Powershell Scripts (VRCFT Discord Link)
To run, right-click the file -> "Run with Powershell"
These scripts will prevent Meta Quest Link from adding the Quest controllers to the SteamVR devices, allowing the use of Index controllers or any other controller of your choosing.
You may have problems with running Powershell scripts downloaded from the internet (for good reason!). You can learn about getting around Microsoft's default script security.
Using Index Controllers with the Quest Pro with Virtual Desktop
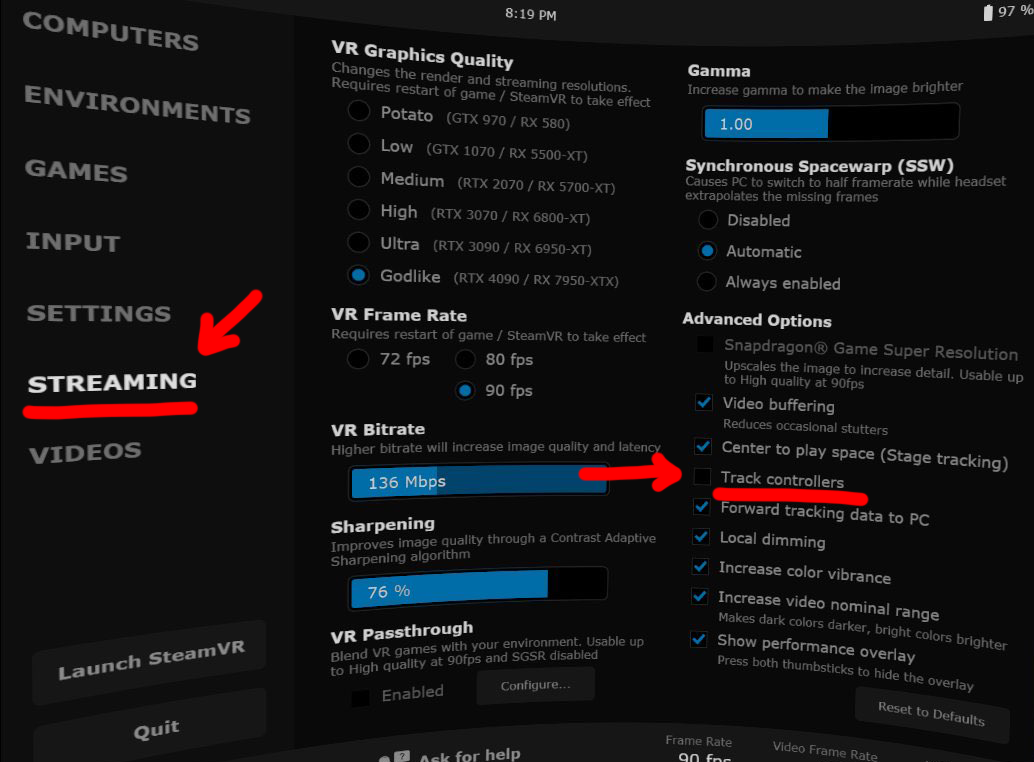
Before launching SteamVR from Virtual Desktop: In the Virtual Desktop "Streaming" tab, untick the "Track controllers" option under "Advanced Options" in the Streaming tab. This will prevent Virtual Desktop from adding the Quest controllers to the SteamVR devices, allowing the use of Index controllers or any other controller of your choosing.
Using Index Controllers with the Quest Pro with ALVR/ALXR
The customizability of ALVR allows a few options in this regard. All following mentioned settings can be found in the "Headset" tab of the ALVR server settings.
- Option 1: Completely disable the Quest Pro controllers using the checkbox next to "Controllers"
- Option 2: Set the Controller emulation to "HTC Vive Tracker". This allows real controllers such as the Index Controllers to take precedence in SteamVR, and allow for using the Quest Pro controllers for manual playspace calibration.
Troubleshooting
NO MODULES LOADED / Stuck on "Initializing Modules"
Whenever you see this, the cause is because the currently installed module failed to initialize (or you're not even giving enough time for the module to fail attempting to load...). Switch to the VRCFT Output Log tab and find the relevant error message.
[Meta Quest Link/Airlink] Error in headset: com.oculus.bodyapiservice keeps stopping
| Cause | You do not have developer mode enabled on both the PC Oculus program and for the headset from the Oculus phone app. |
| Solution | Carefully re-run through the Link/Airlink setup, paying careful attention to all the steps. Double-check that "Developer Runtime Features" is enabled in the Oculus PC program and that Debug Mode is switched on for the Quest Pro in the Oculus phone app. If you can't find these options, your Oculus/Meta account is not a Meta Quest Developer account, or may need to be re-verified as a Developer account. Log in to or sign up at the Meta Quest Developer Center to verify/resolve developer account status. |
[QuestProTrackingModule] Error: [QuestOpenXR] Failed to GetFaceExpressionWeightsFB
| Cause | There is some permission in the setup that was not set correctly. |
| Solution | Carefully re-run through the setup, paying careful attention to all the steps. Double-check that "Developer Runtime Features" is enabled in the Meta Quest Link PC program and that Developer Mode is switched on for the Quest Pro in the Meta Horizon mobile app. If you can't find these options, your Oculus/Meta account is not a Meta Quest Developer account, or may need to be re-verified as a Developer account. Log in to or sign up at the Meta Quest Developer Center to verify/resolve developer account status. |
[QuestProTrackingModule] Error: [QuestOpenXR] Failed to create Face Tracker
| Cause | There is some permission in the setup that was not set correctly or Quest Pro headset is not connected. |
| Solution | Carefully re-run through the setup, paying careful attention to all the steps. Double-check that "Developer Runtime Features" is enabled in the Meta Quest Link PC program and that Developer Mode is switched on for the Quest Pro in the Meta Horizon mobile app. If you can't find these options, your Oculus/Meta account is not a Meta Quest Developer account, or may need to be re-verified as a Developer account. Log in to or sign up at the Meta Quest Developer Center to verify/resolve developer account status. Also make sure that your Quest Pro is actively connected via Link/Airlink before starting VRCFT! |
[QuestProTrackingModule] Error: [QuestOpenXR] Failed to get XrSystemID
| Cause | There is some permission in the setup that was not set correctly or Quest Pro headset is not connected. |
| Solution | Carefully re-run through the setup, paying careful attention to all the steps. Doubly make sure that you have Meta Quest Link set as your OpenXR runtime in the Meta Quest Link Desktop app settings. Make sure that your Quest Pro is *actively connected* (streaming content from PC and screens haven't gone to sleep) via Link/Airlink before starting VRCFT! Try starting VRCFT with the headset on, through the Meta Quest Link Dash desktop view. |
[QuestProTrackingModule] Error: [QuestOpenXR] Failed to create XrInstance
| Cause | There is some required setting in the setup that was not set correctly. |
| Solution | Carefully re-run through the setup, paying careful attention to all the steps. Doubly make sure that you have Meta Quest Link set as your OpenXR runtime in the Meta Quest Link Desktop app settings. Make sure that your Quest Pro is *actively connected* (streaming content from PC and screens haven't gone to sleep) via Link/Airlink before starting VRCFT! Try starting VRCFT with the headset on, through the Meta Quest Link Dash desktop view. |
[QuestProTrackingModule] Error: [QuestOpenXR] Failed to create session and I am NOT using a laptop / eGPU
| Cause | There is something preventing an OpenXR session from being created for the Quest Pro |
| Solution | Carefully re-run through the setup, paying careful attention to all the steps. Doubly make sure that you have Meta Quest Link set as your OpenXR runtime in the Meta Quest Link Desktop app settings. Make sure that your Quest Pro is *actively connected* (streaming content from PC and screens haven't gone to sleep) via Link/Airlink before starting VRCFT! Try starting VRCFT with the headset on, through the Meta Quest Link Dash desktop view. |
[QuestProTrackingModule] Error: [QuestOpenXR] Failed to create session and I AM using a laptop / eGPU
| Cause | There is something preventing an OpenXR session from being created for the Quest Pro, possibly related to Oculus trying to default init on laptop's iGPU |
| Solution | Make sure that you have Meta Quest Link set as your OpenXR runtime in the Meta Quest Link Desktop app settings. Also make sure that your Quest Pro is actively connected via Link/Airlink before starting VRCFT. Try to turn off using integrated GPU through your laptop's BIOS or control center program. Alternatively, use Windows Settings to force VRCFaceTracking to "High Performance" (use discrete GPU). Open Windows Settings and navigate through System -> Display -> Graphics Settings (a small link under "Multiple Displays" section in Win10, or under "Related Settings" in Win11). 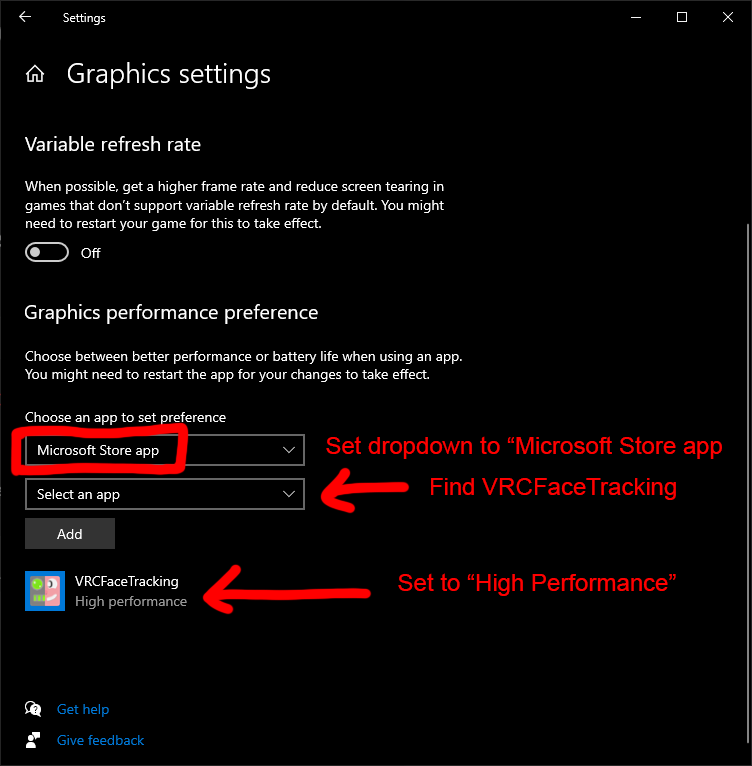 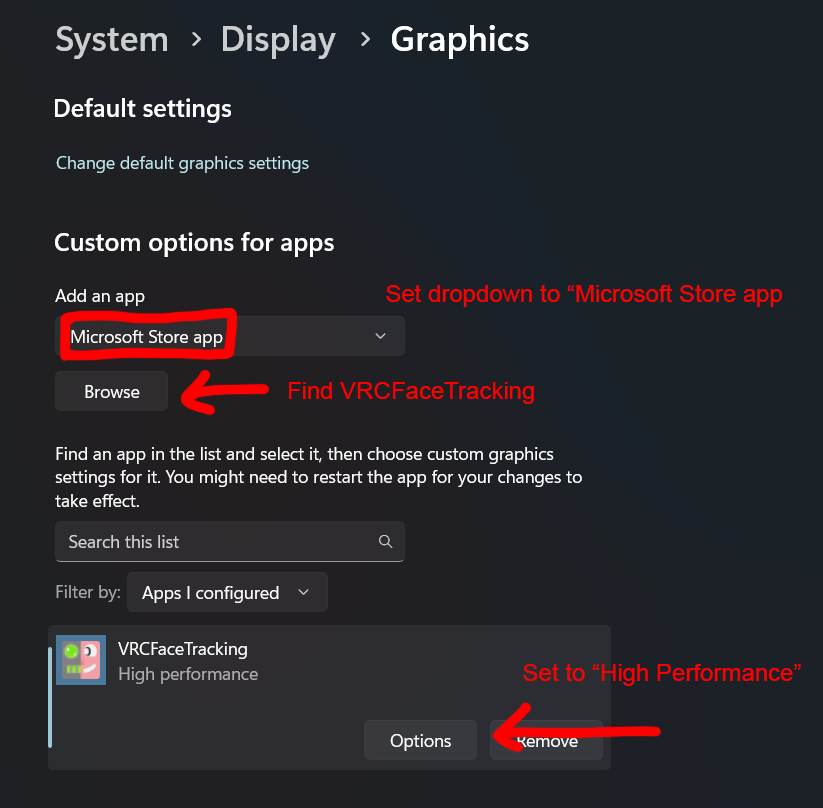 |
[QuestProTrackingModule] Information: Eye Tracking not supported
| Cause | Developer mode is not properly enabled. |
| Solution | On software versions v60, this error seems to be associated with the "Developer Mode" toggle not being enabled for the headset. Use the Meta Horizon mobile app to enable Debug Mode for the Quest Pro headset, then reboot the headset. If the issue persists or the module seems to initialize but doesn't send any data, try logging out then back into your Meta account on both the headset (via mobile app) and Meta Quest Link PC application. |
[Virtual Desktop] Error: [VirtualDesktop] Failed to open MemoryMappedFile. Make sure Virtual Desktop Streamer (v1.29 or later) is running.
| Cause | VRCFaceTracking was started before Virtual Desktop |
| Solution | First, make sure both the Virtual Desktop app in the Quest and the Virtual Desktop streamer versions are at least v1.29. Close VRCFaceTracking, start Virtual Desktop Streamer, reopen VRCFaceTracking. If VRCFaceTracking is started before SteamVR/VRChat is launched from Virtual Desktop, the output log may show a warning that "Tracking is not active". However, after launching SteamVR/VRChat (from Virtual Desktop) the Virtual Desktop module should log that "Tracking is now active!". |
General Problems
[Meta Quest Link/Airlink] I cannot see SteamVR because Link environment is stuck loading some random app
| Cause | The nature of the way VRCFaceTracking must pull data from the Oculus OpenXR runtime from the PC is inherently hacky, effectively running 2 VR programs at once. |
| Solution | If you started SteamVR first, you can simply switch back to SteamVR in the Oculus Dash. You can also try switching up the program startup sequence, starting VRCFaceTracking then SteamVR through the desktop Steam app (not through the Oculus Dash in the headset). Yet another solution is to use OculusKiller to avoid dealing with the Oculus Dash entirely, though this has its own downsides. |
[Meta Quest Link/Airlink] Starting VRCFT forces me out of VRChat and starts a program in SteamVR that never opens
| Cause | You have SteamVR set as the OpenXR runtime, which will cause the headless VRCFT module program to open in SteamVR instead of in the Meta Quest Link environment. |
| Solution | Set your OpenXR runtime to Meta Quest Link in the Meta Quest Link software. |
[Meta Quest Link/Airlink] "I'm not getting any visible errors anywhere and the Module loads, but VRC only receives 0 values for all parameters (and VRC loaded a non-zero number of parameters from config)"
| Cause | Meta Moment |
| Solution | Try toggling the eye and face tracking enables in the headset settings, and restarting your headset completely. Logging out then back into the account in the PC Oculus application and headset may also help. You may also need to re-verify developer account settings if using Oculus Link/Airlink, as well as developer account permissions by logging into the Meta Quest Developer Center. |
[SteamLink] VRCFaceTracking crashes when I set the SteamVR OSC output port to 9015!
| Cause | You changed one of VRCFaceTracking's communication ports to 9015 |
| Solution | Revert VRCFaceTracking's ports back to the defaults (9000 sending / 9001 receiving). VRCFaceTracking uses these ports to communicate with VRChat and should not be changed. Communication with the SteamVR OSC data happens in the SteamLink module on port 9015, and this is handled internally by the module, not the VRCFaceTracking base program! |
My playspace calibration resets if I take off the headset
| Cause | When the Quest headset enters sleep mode after detecting you have taken off the headset, it loses it's original reference space to which the SteamVR space was calibrated to. |
| Solution | Download the Meta Quest Developer Hub and follow the instructions for Connect Headset to MQDH and Disable proximity sensor and guardian. This will prevent the headset from entering sleep, but does mean your headset stays fully active even if you take it off. Alternatively, use another PCVR streaming method that supports Stage Tracking (Virtual Desktop, ALXR, ALVR, SteamLink). |
Don't see your problem here? Think your problem might be unrelated to the module but something else? Take a look at the VRCFT software page or search in the #hardware-software-help forum in the Discord.